Stellar Beauty Steps
My new wallpaper, explained in a some working steps. I created the painting in Corel Painter 11; it took maybe 15 to 20 hours, spread over seven weeks.
First, I create this incredibly detailed sketch ;). I had done a scribble in my sketchbook before that I thought to have a more gloomy atmosphere, but finally decided colourful would be better.

I fiddle with Blender until I find a viewing angle for the planet and rings I can live with. Blender even offers to put in stars. Very meager, but maybe they'll provide ideas where to put real stars later, so I render them too.

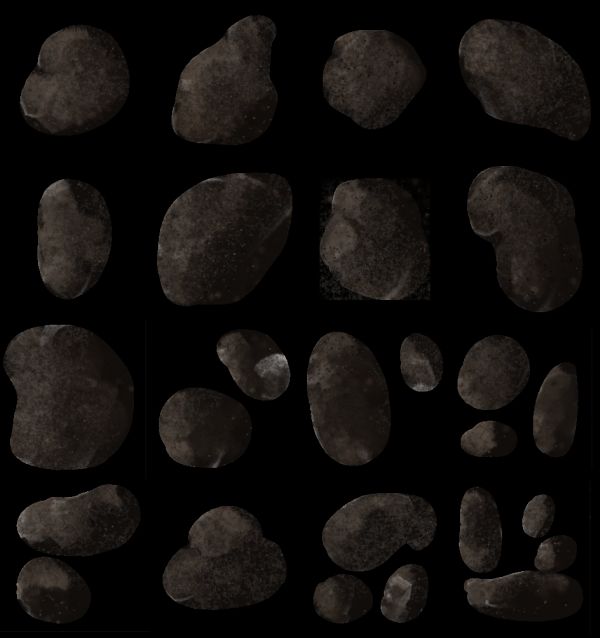
Prior to working on the rings, I create a nozzle in Painter for the asteroids. Several sizes and shapes are needed, and I will only use this for the basics but paint the closer asteroids individually.

I make sure I have the right resolution, then enlarge it to a workable size, in this case, 4000x3000 px. I lay down several passes of colours until I find a combination I like with strongly textured brushes set to low opacity. The wallpaper idea requires me to put any areas of interest, as well as the highest contrast, in the lower right corner, since that is where people normally don't have their desktops cluttered with icons.

I throw in clouds textures for the nebula; partly my own, partly downloaded from cgtextures.com. I use them mainly on the yellow nebula behind the planet, but set to low opacity on the green nebula up right as well, and even lower for the entire picture. Leaving anything completely untextured won't look good. I also make the planet much lighter, put an initial planet texture on it and then start painting all the structures myself with lots and lots of custom textured brushes.
The planet is painted on its own layer. Below, I create a low opacity layer set to Screen for the atmospheric halo.

Now I start adding handpainted structures to the nebula. Doing this is always worth it as it breaks the sometimes too pasted-looking quality of photo textures, but it requires some patience. I use some of the brushes I used before, and small airbrushes. I think that it is most important to handle the opacities right when painting stellar nebulae.
The asteroids are handpainted at this stage, to make sure I won't accept the nozzled ones out of laziness ;). The big one is where my lady will relax.

It's time to break out that nozzle. I try different settings until I get it right. While it is true that a nice nozzle will create a great deal with just one stroke, that means your working time gets shifted to setting it up correctly instead of painting :), but it still saves you time. I also colour the rings to a lighter, dusty colour.

To the stars! I paint over some parts of the nebula with almost black (even in space art, using actual black won't look very good, especially when printed. This colour is something like a very dark brown, I think) to make room for the stars in the back. Thy get painted with the Variable Spatter and Tiny Spattery Airbrush. And then some more stars with my star brush in the yellow nebula right above the planet. That brush resembles a cross with tapered rays. Never use the lensflare for single stars. Lens flares can add realism if placed correctly, but they don't work as stars.

And now, I only have to paint the lady to get a beautiful wallpaper. I clone the entire picture, crop out the part I need and enlarge it to about 5000 px on the longer side. I have my fiancé take a few pictures of me on the couch for the pose. I already know I want an alien-looking character with decorative attire and an accent colour, in this case blue. You can see where I sketched new folds for the skirts after draping a piece of cloth over the couch.

Folds are all done, now I will enlarge the face to get in even more detail. You might argue that this will be a lot of work for a character that will be less than a thousand pixels wide before shrinking the final picture down, but it always shows if you had more detail in.
It is very important to keep the lighting consistent. Sometimes I find this a bit difficult when cropping out parts of picturs for additional detail.

I keep the headdress on a separate layer for now. The dangling pearl strings are done with selections and shaded with airbrushes and regular hard brushes. This works well for metal, but don't forget to add some scratches or dents if the metal wasn't treated well or is very old. Also, the headdress reflects back on her face. So I add blue to the headress and gold to the face on a Soft Light layer. I also define the dress a little more around the head.

And now with the shading all done, I add lashes and rearrange the headdress. Its left part has become lopsided and I cut, paste, distort, and repaint until I'm satisfied. What's to do now is to shrink down the face part and insert it back into the figure, and shrink that down to put it into the wallpaper again. Did I mention how important it is to write down the sizes of parts you are enlarging so that you can fit them back in seamlessly? I normally note those in the file on a layer that only contains stuff I'll throw away, like linework. Or I write it on my desk. Yes, it's a messy desk.

And here we are, all done! The figure is tiny now, but the additional details paid off. Now I let it rest a little bit, and then look at it again on different backgrounds. This is important for dark pictures because I often miss some lighter rim somewhere. That will show on a black background - I also look at drawings on white paper on a white background to find dark scanning edges and such. I hunt it down and kill it, and then I am really done, add my signature and set it as my desktop background.
You can download the wallpaper in high resolution on my deviantart account.

First, I create this incredibly detailed sketch ;). I had done a scribble in my sketchbook before that I thought to have a more gloomy atmosphere, but finally decided colourful would be better.

I fiddle with Blender until I find a viewing angle for the planet and rings I can live with. Blender even offers to put in stars. Very meager, but maybe they'll provide ideas where to put real stars later, so I render them too.

Prior to working on the rings, I create a nozzle in Painter for the asteroids. Several sizes and shapes are needed, and I will only use this for the basics but paint the closer asteroids individually.
I make sure I have the right resolution, then enlarge it to a workable size, in this case, 4000x3000 px. I lay down several passes of colours until I find a combination I like with strongly textured brushes set to low opacity. The wallpaper idea requires me to put any areas of interest, as well as the highest contrast, in the lower right corner, since that is where people normally don't have their desktops cluttered with icons.

I throw in clouds textures for the nebula; partly my own, partly downloaded from cgtextures.com. I use them mainly on the yellow nebula behind the planet, but set to low opacity on the green nebula up right as well, and even lower for the entire picture. Leaving anything completely untextured won't look good. I also make the planet much lighter, put an initial planet texture on it and then start painting all the structures myself with lots and lots of custom textured brushes.
The planet is painted on its own layer. Below, I create a low opacity layer set to Screen for the atmospheric halo.

Now I start adding handpainted structures to the nebula. Doing this is always worth it as it breaks the sometimes too pasted-looking quality of photo textures, but it requires some patience. I use some of the brushes I used before, and small airbrushes. I think that it is most important to handle the opacities right when painting stellar nebulae.
The asteroids are handpainted at this stage, to make sure I won't accept the nozzled ones out of laziness ;). The big one is where my lady will relax.

It's time to break out that nozzle. I try different settings until I get it right. While it is true that a nice nozzle will create a great deal with just one stroke, that means your working time gets shifted to setting it up correctly instead of painting :), but it still saves you time. I also colour the rings to a lighter, dusty colour.

To the stars! I paint over some parts of the nebula with almost black (even in space art, using actual black won't look very good, especially when printed. This colour is something like a very dark brown, I think) to make room for the stars in the back. Thy get painted with the Variable Spatter and Tiny Spattery Airbrush. And then some more stars with my star brush in the yellow nebula right above the planet. That brush resembles a cross with tapered rays. Never use the lensflare for single stars. Lens flares can add realism if placed correctly, but they don't work as stars.

And now, I only have to paint the lady to get a beautiful wallpaper. I clone the entire picture, crop out the part I need and enlarge it to about 5000 px on the longer side. I have my fiancé take a few pictures of me on the couch for the pose. I already know I want an alien-looking character with decorative attire and an accent colour, in this case blue. You can see where I sketched new folds for the skirts after draping a piece of cloth over the couch.

Folds are all done, now I will enlarge the face to get in even more detail. You might argue that this will be a lot of work for a character that will be less than a thousand pixels wide before shrinking the final picture down, but it always shows if you had more detail in.
It is very important to keep the lighting consistent. Sometimes I find this a bit difficult when cropping out parts of picturs for additional detail.

I keep the headdress on a separate layer for now. The dangling pearl strings are done with selections and shaded with airbrushes and regular hard brushes. This works well for metal, but don't forget to add some scratches or dents if the metal wasn't treated well or is very old. Also, the headdress reflects back on her face. So I add blue to the headress and gold to the face on a Soft Light layer. I also define the dress a little more around the head.

And now with the shading all done, I add lashes and rearrange the headdress. Its left part has become lopsided and I cut, paste, distort, and repaint until I'm satisfied. What's to do now is to shrink down the face part and insert it back into the figure, and shrink that down to put it into the wallpaper again. Did I mention how important it is to write down the sizes of parts you are enlarging so that you can fit them back in seamlessly? I normally note those in the file on a layer that only contains stuff I'll throw away, like linework. Or I write it on my desk. Yes, it's a messy desk.

And here we are, all done! The figure is tiny now, but the additional details paid off. Now I let it rest a little bit, and then look at it again on different backgrounds. This is important for dark pictures because I often miss some lighter rim somewhere. That will show on a black background - I also look at drawings on white paper on a white background to find dark scanning edges and such. I hunt it down and kill it, and then I am really done, add my signature and set it as my desktop background.
You can download the wallpaper in high resolution on my deviantart account.


Comments
Post a Comment